Zentrunk & Freeswitch - Regular Trunking
Overview
This documentaion provides a basic configuration to get FreeSwitch up and running with Plivo as the external SIP gateway. This documentation was written using a Debian Jessie GNU/Linux System running FreeSwitch 1.6.6.
To get started with Zentrunk using FreeSwitch you would need to do the following:
- Install FreeSwitch on your environment.
- Create a Trunk on Zentrunk using Plivo Console.
- Configure an Outbound Trunk.
- Configure the Inbound Trunk.
Installation of Freeswitch
On your Debian system, execute the following commands in the terminal:
- Update the Package Manager.
$ apt-get update && apt-get install -y curl - Add the Public Key of FreeSwitch package to local Package Manager.
$ curl https://files.freeswitch.org/repo/deb/debian/freeswitch_archive_g0.pub | apt-key add - - Add the FreeSwitch repository URL to the source list of local Package Manager.
$ echo "deb http://files.freeswitch.org/repo/deb/freeswitch-1.6/ jessie main" > /etc/apt/sources.list.d/freeswitch.list - Install the FreeSwitch package.
$ apt-get update && apt-get install -y freeswitch-all freeswitch-all-dbg gdb
To install Freeswitch on CentOS, follow the instructions given here
To install Freeswitch on Windows, follow the instructions given here
Configuring an Outbound Trunk
To configure Freeswitch to connect to your Plivo Zentrunk, locate the root configuration of FreeSwitch on your machine. These locations vary from platform to platform.
- For Debian Jessie GNU/Linux System, the root configuration is present at
/etc/freeswitch/. - For Windows, the root configuration is located at
C:\Program Files\FreeSWITCH\conf.
For Linux systems, it could be either of the following depending on your installation:
/usr/local/freeswitch/conf/opt/freeswitch/conf
With the root configuration directory located, you must complete the following configurations:
- Create a new SIP Profile.
- Create a Dial Plan.
Step 1: Sip Profile
- Create a new file named “zentrunk.xml” at
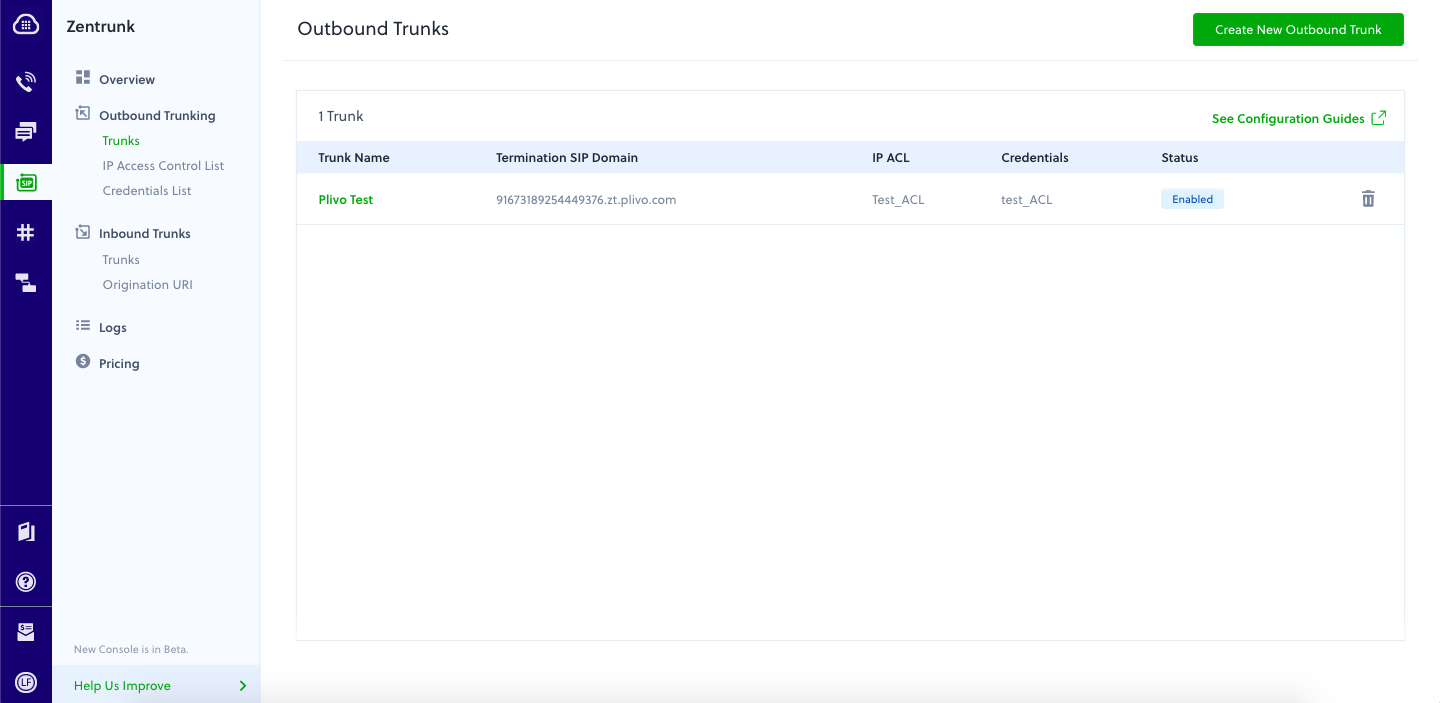
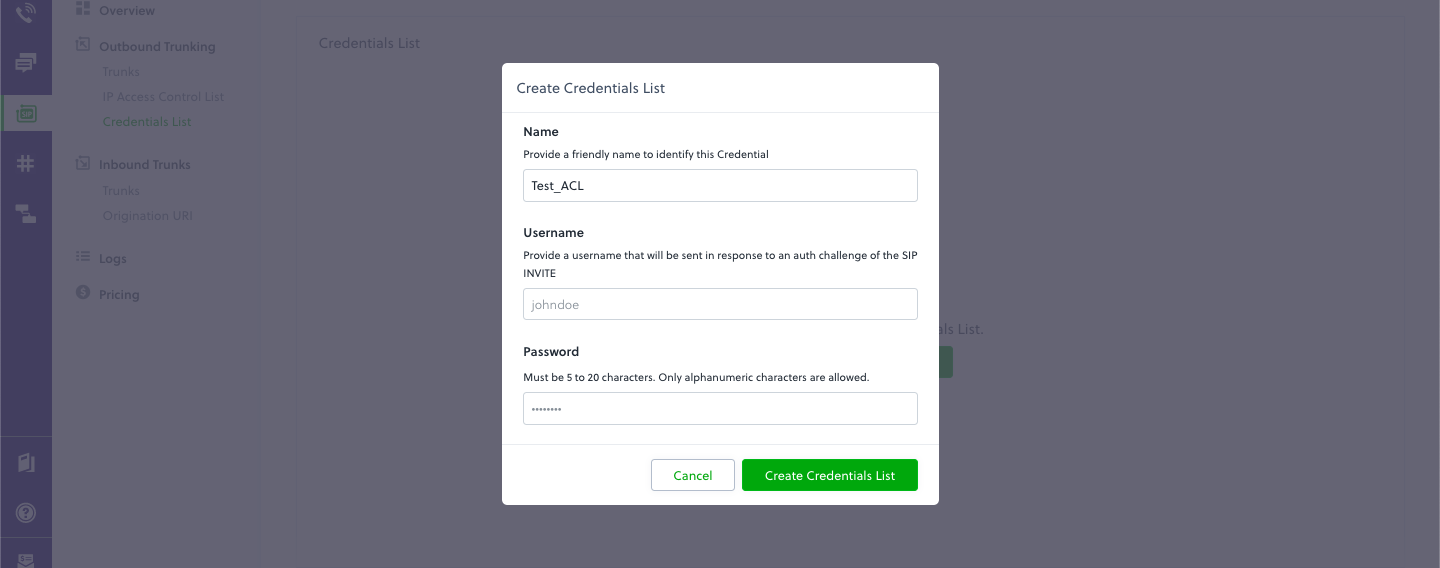
/etc/freeswitch/sip_profiles/external/. - In zentrunk.xml, create a new gateway with your Plivo Zentrunk details (refer the below given images to get your Plivo Trunk details).
<include>
  <gateway name="Plivo-outbound">
    <param name="username" value="Username for TestAuthGroup"/>
    <param name="password" value="Password for TestAuthGroup" />
    <param name="proxy" value="Termination SIP Domain of your Plivo Trunk"/>
    <param name="register" value="false"/>
  </gateway>
</include>
Termination SIP Domain of your Plivo Trunk:

TestAuthGroup Credentials:

Step 2: Dialplan
Next, you should setup a Dial Plan to use the Plivo SIP Profile created in Step 1.
- Create a new file named “02_zentrunk.xml” at
/etc/freeswitch/dialplan/default/. If you already have a dialplan prefixed by 02, you can choose the another number.
<extension name="plivo">
  <condition field="destination_number" expression="^(\d{11})$">
	<action application="set" data="effective_caller_id_number=${outbound_caller_id_number}"/>
	<action application="bridge" data="sofia/gateway/Plivo-outbound/$1"/>
  </condition>
</extension>
The above dial plan has defined an extension for 11 digit US numbers like +1-(222)-(222)-2222. The outbound_caller_id_number field is inherited from vars.xml which would be set as the caller ID while making outbound calls. This extension is set to bridge to your SIP Profile “Plivo-outbound”.
Step 3: Reload Configurtions
- Load the fs_cli utility. Execute
fs_cliin your terminal. - Reload the dialplan. Execute
reloadxml. - Add the new SIP Profile, Execute
sofia profile external rescan
Test your setup
FreeSwitch instances have default users and SIP passwords preconfigured. To prevent being hacked, we recommend you change the default password.
Open vars.xml located at /etc/freeswitch/ and edit the following line:
<X-PRE-PROCESS cmd="set" data="default_password=set your password here"/>
This change is applicable to all users under /etc/freeswitch/directory/default/. If you want to change the password per user, then navigate to /etc/freeswitch/directory/default/ and edit 1000.xml (or any user of your choice).
<param name="password" value="set your password here"/>
Execute reloadxml in fs_cli utility after making changes to users xml.
Note: Freeswitch has to be restarted if any changes were made to vars.xml.
Make an outbound call
When the account is successfully enabled on X-Lite, it is ready to make calls. Enter any valid 11 digit US number in your X-Lite and hit on the call button. This call would hit your freeswitch server first, then go through Plivo Zentrunk and finally reach the destination number.
To know more about configuring X-lite for outbound calls, check the X-lite configuration guide
Configuring an Inbound Trunk
To configure the Freeswitch to connect to your Plivo inbound Zentrunk, first locate the root configuration of FreeSwitch on your machine. These locations vary from platform to platform.
- For Debian Jessie GNU/Linux System, the root configuration is present at
/etc/freeswitch/. - For Windows, the root configuration is located at
C:\Program Files\FreeSWITCH\conf.
For Linux systems, it could be either of the following depending on your installation -
/usr/local/freeswitch/conf/opt/freeswitch/conf
With the root configuration directory located, there are three major configurations that needs to done:
- Create a Dial Plan.
- Create a User
- Change access control list
Step 1: Dialplan
Create a new file named “03_zentrunk.xml” at /etc/freeswitch/dialplan/default/. If you already have a dialplan prefixed by 03, you can choose the another number.
Use the XML Under the context =public
<extension name="inboundbridge" continue="true">
 		<condition field="destination_number" expression="^(\+)?your_destination_number$">
        <action application="log" data=" Pleasewait we are connecting to plivo inbound NMS"/>
	    <action application="set" data="bypass_media=true"/>
    	<action application="export" data="sip_from_uri=${sip_from_uri}"/>
        <action application="bridge" data="user/1000"/>
  	</condition>
</extension>
Values to be replaced:
^your_destination_number$= The destination number on which you want to receive the incoming callStep 2: Access control list
Open the file acl.conf.xml at autoload_configs/acl.conf.xml. We will have to Whitelist Plivo outbound SIP IP found in zentrunk page.
Step 3: Create a User
Open the file found at freeswitch/directory/default/1000.xml Use the below XML as a reference to edit the user 1000.
<include>
  <user id="1000">
    <params>
      <param name="password" value="${default_password}"/>
      <param name="vm-password" value="1000"/>
    </params>
    <variables>
        <variable name="to_allow" value="domestic,international,local"/>
        <variable name="accountcode" value="1000"/>
        <variable name="user_context" value="default"/>
        <variable name="effective_caller_id_name" value="Extension 1000"/>
        <variable name="effective_caller_id_number" value="1000"/>
        <variable name="outbound_caller_id_name" value="$${outbound_caller_name}"/>
        <variable name="outbound_caller_id_number" value="$${outbound_caller_id}"/>
        <variable name="callergroup" value="techsupport"/>
     </variables>
      </user>
</include>FreeSwitch instances have default users and SIP passwords preconfigured. To prevent being hacked, we recommend you change the default password.
Open vars.xml located at /etc/freeswitch/ and edit the following line:
<X-PRE-PROCESS cmd="set" data="default_password=set your password here"/>
This change is applicable to all users under /etc/freeswitch/directory/default/. If you want to change the password per user, navigate to /etc/freeswitch/directory/default/ and edit 1000.xml (or any user of your choice).
<param name="password" value="set your password here"/>
Execute reloadxml in fs_cli utility after making changes to users xml.
Step4: Reload Configurations
- Load the fs_cli utility. Execute
fs_cliin your terminal. - Reload the the changes made to the XML’s. Execute
reloadxml. - Reload the ACL file. Execute
reloadacl. - Reload the dialplan Execute
Reload mod_dialplan_xml. - Restart the service . Execute
Service freeswitch restart.
Receive an inbound call
When the account is successfully enabled on X-Lite, it is ready to receive calls. Dial the number provided in the “your_destination_number$” field and the calls will first hit the Plivo inbound zentrunk and then go through your FreeSWITCH to reach your endpoint.
To know more about configuring X-lite for Inbound calls, check the X-lite configuration guide
