FreeSwitch using Secure Trunking for Outbound calling
Overview
This documentation provides configuration for secure and reliable data transfer between your SIP device and Zentrunk infrastructure. This documentation was written using a Debian 9 Stretch GNU/Linux system running FreeSwitch latest release version.
To get started with Zentrunk Secure Trunking using FreeSwitch you would need to do the following:
Installation of FreeSwitch
On your Debian 9 Stretch system, execute the following commands in the terminal:
- Update the Package Manager.
$ apt-get update && apt-get install -y gnupg2 wget - Add the Public Key of FreeSwitch package to local Package Manager.
$ wget -O - https://files.freeswitch.org/repo/deb/debian-release/fsstretch-archive-keyring.asc | apt-key add - - Add the FreeSwitch repository URL to the source list of local Package Manager.
$ echo "deb http://files.freeswitch.org/repo/deb/debian-release/ stretch main" > /etc/apt/sources.list.d/freeswitch.list$ echo "deb-src http://files.freeswitch.org/repo/deb/debian-release/ stretch main" >> /etc/apt/sources.list.d/freeswitch.list - Install the FreeSwitch package.
$ apt-get update && apt-get install -y freeswitch-meta-all
Configuring a Secure Outbound Trunk (TLS and SRTP)
To configure FreeSwitch to connect to your Plivo Secure Zentrunk, locate the root configuration of FreeSwitch on your machine. For Debian 9 Stretch GNU/Linux System, the root configuration is present at /etc/freeswitch/.
With the root configuration directory located at /etc/freeswitch/, you must complete the following configurations:
- Create a new SIP Profile.
- Create a Dial Plan.
Step 1: Creating a SIP Profile Gateway
- Create a new file named “zentrunk.xml” at /etc/freeswitch/sip_profiles/external/.
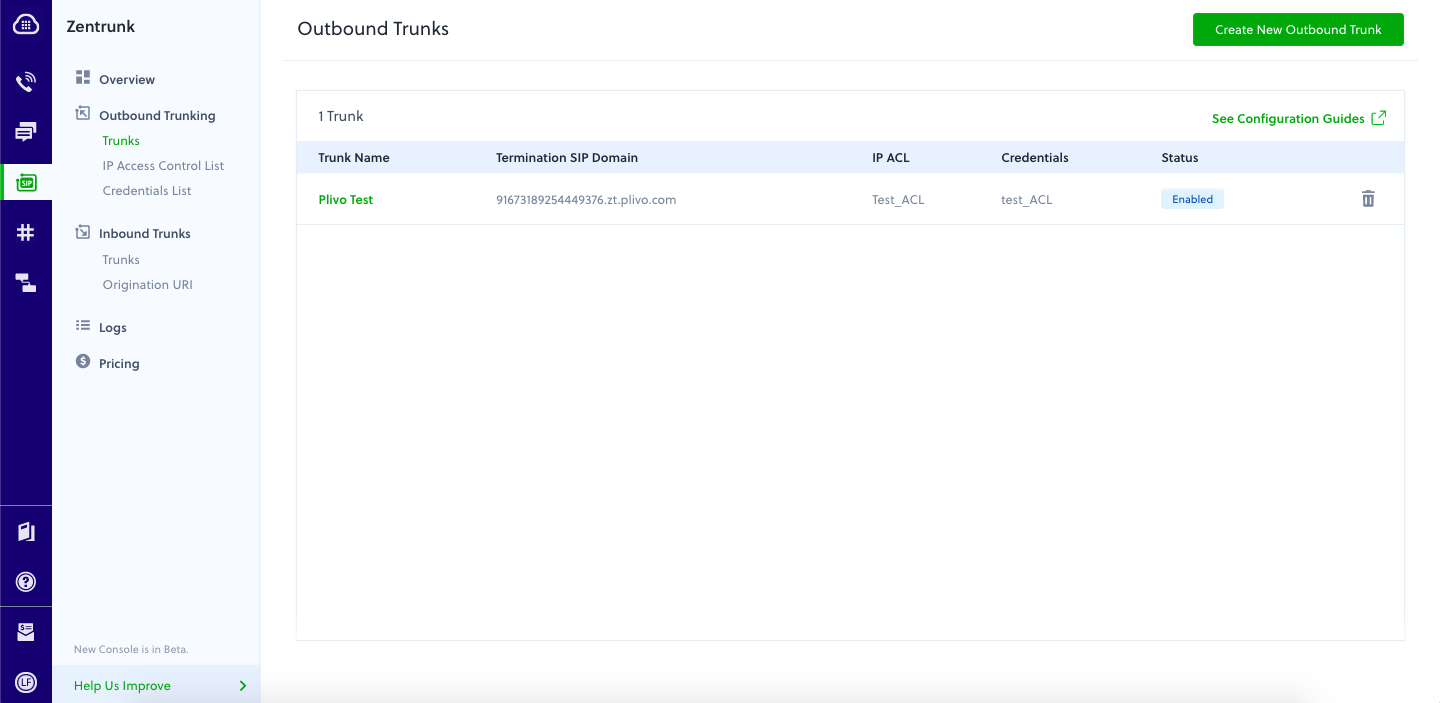
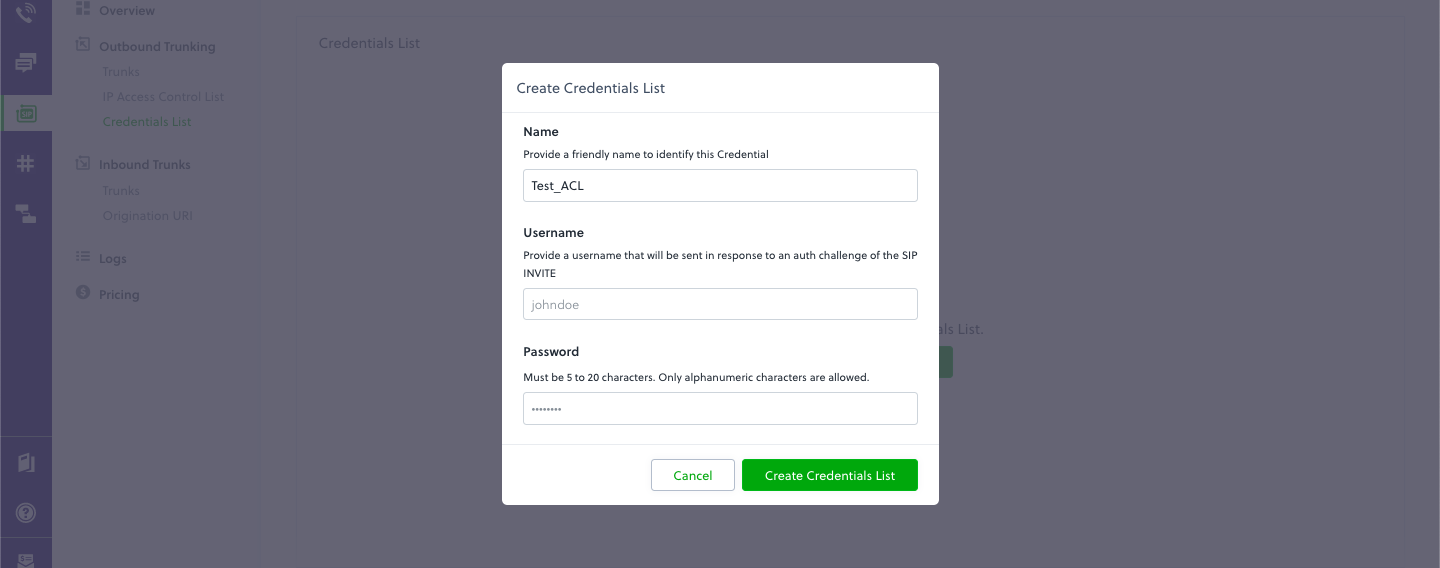
$ touch /etc/freeswitch/sip_profiles/external/zentrunk.xml - In zentrunk.xml, create a new gateway with your Plivo Secure Zentrunk details (refer the below given images to get your Plivo Trunk details).
$ vim /etc/freeswitch/sip_profiles/external/zentrunk.xml<include> <gateway name="Plivo"> <param name="tls-version" value="tlsv1"/> <param name="register-transport" value="tls"/> <param name="username" value="Username for TestAuthGroup" /> <param name="password" value="Password for TestAuthGroup" /> <param name="caller-id-in-from" value="true"/> <param name="proxy" value="Termination SIP Domain of your Plivo Trunk"/> <param name="register" value="false"/> </gateway> </include>
Termination SIP domain of your Plivo Outbound Trunk:

Create the AUTH GROUP Credentials:

Step 2: Dialplan
FreeSwitch creates a certain set of default dialplan xml files post installation which are not relevant for setup. Please ensure a SIP profile has been created before proceeding to create a dial plan.
- FreeSwitch creates a set of default xml configuration files during installation that we won’t need. We are removing them with the following commands:
$ rm -rf /etc/freeswitch/dialplan/default/$ rm -rf /etc/freeswitch/dialplan/skinny-patterns*$ rm /etc/freeswitch/dialplan/features.xml - Replace the public dialplan /etc/freeswitch/dialplan/public.xml with the following xml:
$ vim /etc/freeswitch/dialplan/public.xml<?xml version="1.0" encoding="utf-8"?> <include> <context name="public"> <extension name="Plivo-Secure"> <condition field="destination_number" expression="^(\d+)$"> <action application="set" data="proxy_media=false"/> <action application="set" data="bypass_media=false"/> <action application="export" data="nolocal:rtp_secure_media=true:AES_CM_128_HMAC_SHA1_80"/> <action application="set" data="dialed_number=$1"/> <action application="log" data="INFO Processing for plivo Secure ${dialed_number}"/> <action application="bridge" data="sofia/gateway/Plivo/$1"/> </condition> </extension> </context> </include>
Step 3 : Generate SSL Certificate
You could generate the certificate as described here
1 - Generate the CA (Root) Certificate
To use TLS/SSL you need at least two certificates: the root (CA) certificate and a certificate for every server. There is a script at
_/{prefix}/freeswitch/bin/gentls_cert _or within the source tarball _{tarball}/scripts/gentls_cert_
that helps generate these files. Assuming that the DNS name of your FreeSWITCH PBX is pbx.mydomain.tld, with
$ /usr/bin/gentls_cert setup -cn pbx.mydomain.tld -alt DNS:pbx.mydomain.tld -org mydomain.tld
This will create CA certificate and key along with in /etc/freeswitch/tls/CA directory and certificate in the /etc/freeswitch/tls folder.
Output:
root@ip-x.x.x.x:/etc/freeswitch/dialplan#  /usr/bin/gentls_cert setup -cn pbx.freeswitch.org -alt DNS:pbx.freeswitch.org -org freeswitch.org
Creating new CA...
Generating a RSA private key
...................................................................
writing new private key to '/etc/freeswitch/tls/CA/cakey.pem'
DONE
Note: The name given for -cn and -alt should be the same as the DNS name of your FreeSwitch installation and used as the registrar name on the phone (at least on Polycom devices). ] You can change the "DAYS=2190" line in the gentls_cert file to make the certificate valid for a longer time. However making it too long has some wrap around problem, it appears.
2 - Generate the Server Certificate
$ /usr/bin/gentls_cert create_server -cn pbx.freeswitch.org -alt DNS:pbx.freeswitch.org -org freeswitch.org
Output:
root@ip-x.x.x.x:/etc/freeswitch/dialplan# /usr/bin/gentls_cert create_server -cn pbx.freeswitch.org -alt DNS:pbx.freeswitch.org -org freeswitch.org
Generating new certificate...
--------------------------------------------------------
CN: "pbx.freeswitch.org"
ORG_NAME: "freeswitch.org"
ALT_NAME: "DNS:pbx.freeswitch.org"
Certificate filename "agent.pem"
[Is this OK? (y/N)]
y
Generating a RSA private key
.............................................................................................
writing new private key to '/tmp/fs-ca-15020-20190920094519.key'
Signature ok
subject=CN = pbx.freeswitch.org, O = freeswitch.org
Getting CA Private Key
DONE
This creates the server certificate at /etc/freeswitch/tls/agent.pem. This file contains the certificate and the private key. It should contain the domain name in the common and alternate name. If you need to generate certificates for other servers use the -out flag for gentls_cert to specify the output certificate/key file name and copy this to the remote server.
In order for the new certificate to take effect (the only way for FreeSWITCH to use it), FreeSWITCH must be restarted.
Note: The name given for -cn and -alt should be the same as the DNS name of your FreeSwitch installation and used as the registrar name on the phone (required for Polycom devices and Eyebeam softphone).
Verify your certificate
You can review your certificate details with the following command:
$ openssl x509 -noout -inform pem -text -in /etc/freeswitch/tls/agent.pem
$ cd /etc/freeswitch/tls
$ chmod 640 agent.pem cafile.pem
FreeSwitch only requires the agent.pem file to act as a TLS server. It contains the certificate and the key).
Note: It is extremely important that your agent.pem (and optionally cafile.pem) have read permissions for the user FreeSwitch will run as.
For example, if you are starting FreeSwitch with the following option_ -u freeswitch,_ you have to give read permissions to the “freeswitch” user with the following command:
$ chown root.freeswitch agent.pem cafile.pem
$ chmod 640 agent.pem cacert.pem
3 - Enable TLS
$ vim /etc/freeswitch/vars.xml :

_<X-PRE-PROCESS cmd="set" data="external_ssl_enable=true"/>_
$ vim /etc/freeswitch/sip_profiles/external.xml :

_<param name="tls-cert-dir" value="/etc/freeswitch/tls/"/>_
Step 4: Restart FreeSwitch
You have to restart FreeSwitch for the changes to take effect
$ service freeswitch start
To check freeswitch running status:
$ service freeswitch status
Test your setup
FreeSwitch instances have default users and SIP passwords preconfigured. To prevent any intrusion, we highly recommend you to change the default password.
Open vars.xml located at /etc/freeswitch/ and edit the following line:
<X-PRE-PROCESS cmd="set" data="default_password=set your password here"/>
This change is applicable for all users under /etc/freeswitch/directory/default/. If you want to change the password per user, then navigate to /etc/freeswitch/directory/default/ and edit 1000.xml (or any user of your choice).
$ vim /etc/freeswitch/directory/default/1000.xml
<param name="password" value="set your password here"/>
<variable name="user_context" value="public"/>
<variable name="effective_caller_id_name" value="Extension 1000"/>
<variable name="effective_caller_id_number" value="Your Caller ID"/>
Execute reloadxml in fs_cli utility after making changes to any user’s xml.
$ fs_cli -x “reloadxml”
Make an Outbound Call
When the account is successfully enabled on X-Lite, it is ready to make calls. Enter any valid 11 digit US number in your X-Lite and click on the call button. This call would go to your freeswitch server first, then through Plivo Secure Zentrunk and finally reach the destination number.
To know more about configuring X-lite for outbound calls, check the X-lite configuration guide
